Microsoft Teams has become an integral part of remote collaboration, and with the new Teams client, users can experience enhanced features and improved performance. When upgrading the Teams client for some customers I experienced some problems. In this guide, we’ll walk through the steps to install the new Microsoft Teams client on Azure Virtual Desktop (AVD) or Windows 365 and give solutions for the problems I encountered.
Why upgrade
The main reason to upgrade is the improved performance. It has been build from the ground up and since this new version is General Available, now is a good time to upgrade.
Another reason is the classic Teams for VDI will reach end of support on June 30th, 2024.
Prerequisites
The normal prerequisites apply, such as having an up to date client, installing the WebRTC Redirector Service and having the IsWVDEnvironment registry key in place. For the further steps I assume you already have installed the Classic Teams and fulfill the prerequisites.
Installing the new Teams client
First, decide if you want to retain the Classic Teams client. This allows users to choose which client they use. You can remove the Classic Teams, but this is not mandatory.
I prefer to use a custom image when deploying Azure virtual desktop, so for the next step I connect the VM with my custom image. This step can also be done on the AVD session host.
Download the teamsbootstrapper.exe from the Microsoft site. From an elevated command prompt or powershell run the executable with the -p parameter:

The next time users log in after this change, the new Teams will be available in the start menu:

The first problem we ran into was that the application disappeared for users after a while. The cause was FSLogix not saving some local cache files, resulting in the new Teams client becoming unregistered. Fortunately, Microsoft addressed this later on with a a new (preview) version of FSLogix.
Another issue which occurred was an error message: “Your admin has restricted access to the new Teams”:

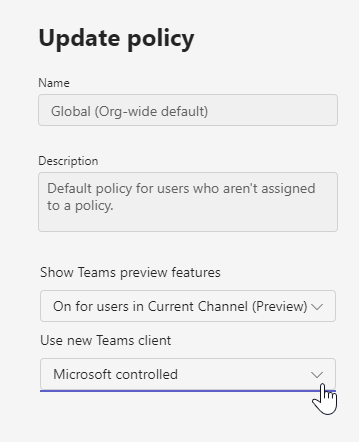
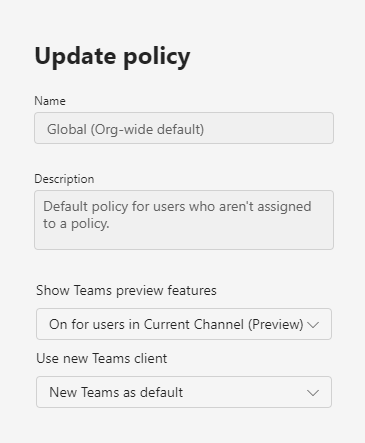
We tried two different solutions/workarounds for this. The first one is changing the default to the new Teams client instead of “Microsoft Controlled” in the Update Policy in Teams Admin center:
This policy has impact on all users targeted. If you can’t or don’t want to change this policy right now, a workaround is to change the attributes of some cache files, for example using cmd, as a user:
attrib +r "%LOCALAPPDATA%\Packages\MSTeams_8wekyb3d8bbwe\LocalCache\Microsoft\MSTeams\EBWebView\WV2Profile_tfw\Local Storage\leveldb\*" /s /dThis can be automated with a group policy for example.
Conclusion
The new Teams client improves the performance and user experience a lot. It is also fairly easy to deploy the new Teams client. The two problems we ran into were show stoppers, fortunately Microsoft addressed it and I hope with these tips I can save you time troubleshooting.